Learn Excel Now

Conquer the Fear of Excel

  • Home
    • Our Team
  • Training
    • Custom Training
      • Custom Virtual Group Training
      • Custom Onsite Group Training
      • Consulting Services
    • Excel
    • MS Office
    • Outlook
    • PowerPoint
    • Word
    • OneDrive
    • Google
  • All-Access
  • eLearning
    • Excel Foundations
    • Micro Courses
      • Simply Excel
      • Simply Excel Pt. II
      • Excel Pivot Tables Made Easy
      • Simply Outlook
      • Simply PowerPoint
  • Resources
    • Contact
    • FAQ
    • New User Onboarding
  • Login

Excel Essentials: Adding Images to a Spreadsheet

September 28, 2016 by Tyrone Pernsley

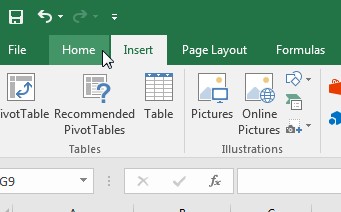
Excel has many tools to help you master the look and feel of your spreadsheet. One feature it offers is the ability to add images to your spreadsheet. It can be an object from clip art, an original photo, downloaded images – as long as it’s in an image file, you can add it to Excel.

Let’s say you were putting together a sales report to send out to potential vendors. You are working with the following spreadsheet:

image-1

Now, your boss tells you he wants to add the company logo to the spreadsheet to give it a more polished and professional look. This is the process for adding the company logo:

adding-images-to-a-spreadsheet

  • Step 1: Prep your spreadsheet for the added image
  • Step 2: Go to the “Insert Ribbon”
  • Step 3: Click on the icon for ‘Pictures’
  • Step 4: Select the image you want to use in the dialogue box
  • Step 5: Click OK
  • Step 6: Using the Drag options on the image, resize to preferred size
  • Step 7: Double check to make sure it looks good.

You are now done with adding the company logo. Adding images to your spreadsheets can add value, relevance or just make them more fun.

We at Learn Excel Now hope you now feel confident adding images to Excel and formatting them to make your spreadsheets look great.

Like Learn Excel Now? Follow us on social media and share our content with your networks! And don’t forget to sign up for the Newsletter

Kevin – Learn Excel Now

Excel MAX and MIN Functions: Essential Tips for Success

September 21, 2016 by Tyrone Pernsley

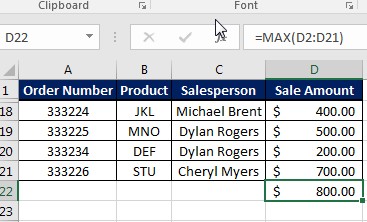
There are far too many Excel functions for one person to learn, but there are essential functions every user should know. The MAX and MIN functions are two such functions. The MAX function allows you to find the highest number in given range. The MIN function does the opposite, providing you with the lowest number in a defined range. This quick tutorial will cover the basics on how to apply both functions.

For this brief tutorial, we will use the following dataset:

max-and-min-function-image-1

Let’s say you had this sales table and your manager wanted you to find the highest sale and lowest sale over a given time period. Using the example above, it might actually be easy to eye it up because there are only 20 rows of data. But in a real sales spreadsheet, it could range hundreds or thousands of rows.

So, we will use the MAX function. The syntax is easy:

=MAX(Number 1, number 2)

In above table, we are looking for the highest sale in column D, which means the function will look like:

=MAX(D2:D21)
max-function-1

Once the formula is entered, it will return the desired value:

max-function-2

On the flip side, the MIN function has a similar syntax:

=MIN(number 1, number2)

And again, our table is in column D, so the function becomes:

=MIN(D2:D21)
min-function-1

Once the formula is entered, Excel will return the desired value:

min-function-2

In addition to SUM, IF statements and VLOOKUP, the MAX and MIN functions are the most essential functions in Excel. We at Learn Excel Now hope you now feel confident in applying these functions to your everyday Excel use.

Like Learn Excel Now? Follow us on social media and share our content with your networks! And don’t forget to sign up for the Newsletter

Kevin – Learn Excel Now

  • « Previous Page
  • 1
  • 2
All Access Subscription
Our 1-year all-access subscription provides step-by-step guidance for mastering Microsoft Office applications, with workshops, exercises and quick reference eGuides. It's perfect for anyone that needs to brush up on certain skills or even folks who need to learn the programs - from a beginner’s level.
Excel Foundations
Take the fear out of Excel with this 20 module self-paced training course. You will cover the most essential topics to develop a solid foundation of Excel or a lifetime of mastery.

Learn Excel Now helps you conquer the fear of Excel. By providing self-paced and instructor-led training and free strategies and guides, we leave no Excel mystery unsolved.

  • Home
  • Training
  • All-Access
  • Excel Foundations
  • Resources

Connect with Us

  • Facebook
  • Linkedin

Contact

Learn Excel Now
questions@learnexcelnow.com
1-484-259-7664 or 1-800-964-6033
660 American Ave
Suite 203
King of Prussia, PA 19406

Microsoft® Office Excel® is a registered trademark of the Microsoft Corporation in the United States and other countries. All rights reserved.

Copyright © 2023 ­Learn Excel Now

Terms of Service

Privacy Policy

Copyright © 2023 · News Pro Theme on Genesis Framework · WordPress · Log in

WELCOME BACK!

Enter your username and password below to log in

Forget Your Username or Password?

Reset Password

Lost your password? Please enter your username or email address. You will receive a link to create a new password via email.

Log In