
Excel Database Tips: Keys to Organizing Your Data
An Excel database is a great way to organize your data. It includes a series of records in rows with fields of data entered in columns. Here are some tips to make using Excel as database easier.
Organizing Your Data
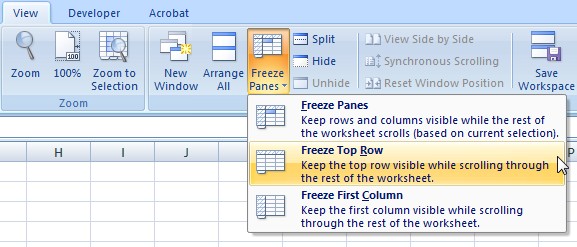
To use Excel as a database, your data has to be structured in a specific way. First, each column has to contain the same category of data in every row of that column. Similarly, each row must contain all of the data for the same one thing (person, group, organization, object, etc). To indicate this thing that the row represents, the first column of each row must contain a unique name. The top row must contain a unique column heading for each column to indicate which data is stored in that column. This top row containing the column headings should be formatted differently than the rest of the data to make the headings stand out. If you have a long database, you can freeze that top row, so that you can always see the column headings even as you scroll down. To do this, go to the “View” tab and click on “Freeze Panes.” From there, click on “Freeze Top Row.” When entering your data, make sure to keep your data formatted in the same way throughout your spreadsheet. You also want to make sure that you didn’t leave any rows blank. You can have blank cells throughout the database, but you can have blank rows or it will mess up your data when you try to sort or filter it.

Sorting Data
To sort your data, go to the “Data” tab and click on the “Sort” button. The dialog box will pop up, and you will need to choose which column you want the data to be sorted by. Then you will need to choose what you want the sorting to be based upon (ie. values, cell font, cell color, etc). Finally, you will need to choose how you want the data to be sorted (ie. smallest to largest, a certain color on top/bottom, etc).

Remove Duplicates
To remove duplicates in your database, select the database area, and then go to the “Data” tab and under “Data Tools” click on “Remove Duplicates.” A dialog box will appear and prompt you to mark the columns that you want to examine for duplicate values. The duplicates will be removed and the dialog box will display the results. However, this command can’t be undone, so make sure you select the correct columns to examine for duplicate values. To verify that you are selecting the correct columns, you can highlight the duplicate values by going to “Conditional Formatting.” Then select “Highlight Cell Rules” and select “Duplicate Values.” The duplicate values will be highlighted and you can verify that those are the values that you want removed.

AutoFilter
The AutoFilter shows a partial list of data based on a certain criteria. To set up this filter, go to the “Home” tab and click on “Sort & Filter” or you can go to the “Data” tab and click on “Sort & Filter” and select “Filter.” Then you’ll be able to use the drop-down arrow to select a subgroup of records that you want shown. To do this, remove the checkmark from “Select All” and check only the items you want to display. To clear the filter, click on “Select All” from the drop-down list or click on “Clear Filter.”
We here at Learn Excel Now hope you now feel confident in your ability to create an Excel Database. It is our desire to bring you the best advice possible to effectively and efficiently use Excel so you can focus on your work. Subscribe to our blog to receive weekly Excel tips. If you’re looking for more in-depth training check out our upcoming instructor-led, live online trainings.
Liked these Excel Database tips? Have questions? Leave your comments below; we’d love to hear from you.
Getting Social with Excel: Spread the word and share the knowledge!
Kevin – Learn Excel Now